Open topic with navigation (left menu)
Assignments
Assignments are specified tasks given to participants. The teacher provides the participants with an assignment and the participants submit the assignment answers in itslearning. The teacher then corrects the assignment and assesses it.
When you use the assignment tool, you accomplish the following:
- The participants are automatically notified when you add an assignment.
- The participants can submit assignments both individually and in groups.
- You are automatically informed about who submitted and when they submitted.
- The participants can submit individually or in groups.
- You can give feedback and mark the assignments through itslearning.
- The participants receive feedback automatically after the assignment is corrected.
- The assignments and grades are automatically saved in the folders of the participants, together with your comments.
Assessing assignments
The itslearning's assignment tool allows the participants to submit answers individually or in groups. When assessing, the teachers can assess individual participants or several participants at the same time.
Anonymous submissions
Anonymous submission allows participants to hand in assignments anonymously. This means that teachers cannot see the names of the participants when marking the work. The learners' actual names are replaced with codes. The final results can be made available in the grade book, but they will not be visible for the teacher before they are published for the participants.
To enable anonymous submissions, tick the Anonymous submission box when adding the assignment.
Multiple assessment
The Assess multiple function is time-saving for the teacher. In the assessment process, most teachers take notes along the way and are left with a general impression on what grade the individual participant should receive. It is time-saving for the teacher to assess all the participants to receive a C at the same time, instead of having to go through all the individual assignments to set a grade. This particularly applies to large courses.
When you want to assess multiple participants, check the boxes in front of the participants you want to assess in the same batch and click the Assess multiple link in the assignment overview:

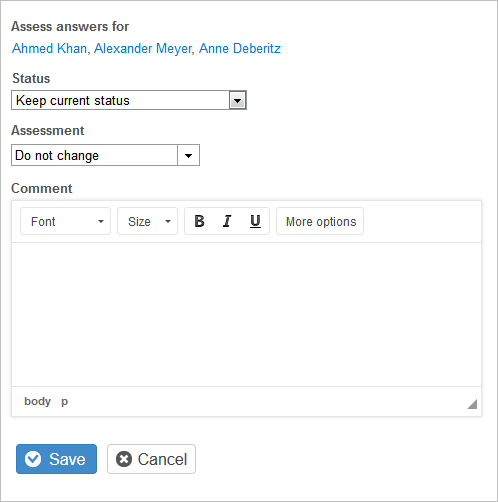
On the next page you see the participants for whom you assess answers, and you can change the status, set an assessment and enter a comment. Note that all the participants in the Assess answers for list receive the same status, assessment and comment.

Group hand-ins
Course groups
If you enable group hand-ins, the teacher can select whether to use course groups, individual groups, or self-enrolment. A course group is a group that is created in a course from the Groups link in the navigation tree. Individual groups are groups that the participants create themselves.

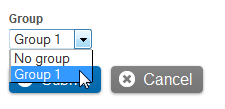
When you participate in an assignment as a member of a course group, you answer the assignment as normally. When the assignment is ready, one of the members submit it on behalf of the entire group. At the bottom of the answer assignment page there is a Group drop-down list. Select your group from this list and click Submit. It is still possible to submit an assignment individually without being part of a group. In this case, select the option No group.

Learner-defined groups
If you enable learner-defined groups, participants are allowed to create their own groups. The participant that submits the assignment select the other participants from a list:

Self-enrolment
When participating in a group assignment, a learner has the option of joining an existing assignment group. Members of a group are notified of new members via the internal messaging system. This allows a teacher with, for example, 60 participants in a course to hand out an assignment and tell the learners to organize themselves in groups of, for example, four.
General group hand-in features
When you are part of a group that has submitted an answer, you can withdraw from the group. Click on the assignment and click the link Withdraw from a group:

If you for some reason want to join another group’s submitted answer, you can click the Join an answer submitted by another group link.

Click the link and select the group you want to join from the drop-down list.
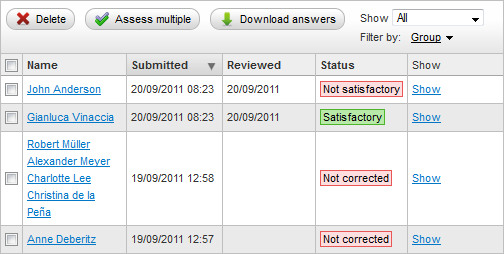
When groups are used, the assignment overview looks like this for the teacher:

The participant that submitted the answer is listed first, with the other participants listed below. You can see that Thomas Nemeth has submitted his assignment alone.
Send reminders
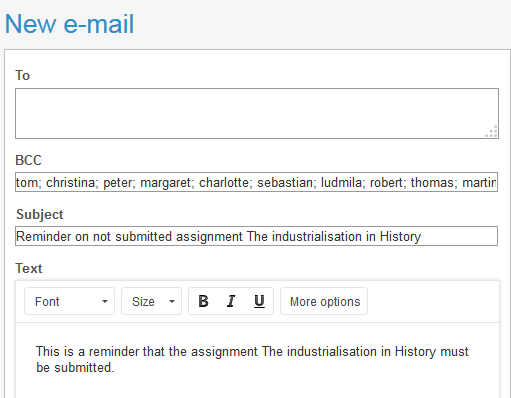
Teachers are now allowed to send reminders to participants that have not yet submitted an assignment. This can be done manually from the assignment overview by clicking the Send reminders link. The reminder message is sent through the internal message system. The addresses of the participants that have not replied is automatically added in the To field and the teacher can write a message to the participants in the text field.

Submit after deadline
When teachers add an assignment, they can decide whether to allow the participants to submit after the deadline.

Print assignment
There is a Print assignment link under the Settings cogwheel. Click the link to print the assignment:
Saving assignments as drafts
Participants can save assignments as drafts by clicking the Save as draft button. Teachers will be able to see draft answers, but will be informed of an assignment’s draft status.

How-tos
 Adding an assignment
- Enter a course.
- Click Add in the navigation tree.
- Click Assignment in the work area.
- Fill in the following fields:
- Title: Enter an assignment title.
- Text: Enter an introduction or assignment text. The assignment text can be written in this text field or be uploaded as a separate file. See Files below.
- Deadline: Here three options are provided in the drop-down list:
- No deadline: Select this option if no deadline is to be used.
- Set date: This option sets a deadline date only. The deadline expires at midnight on the specified date. Use the date picker to select a deadline date.
- Set date and time: This option allows you to select both date and time (in hours and minutes). Use the date picker to select a deadline date. In addition, select hour and minute from the drop-down lists.
Allowed to submit after deadline: Check this box if you want to allow the participants to submit after the deadline. If you leave this box unchecked the participants are not allowed to submit after the deadline.
- Mandatory: Indicate whether the assignment should be mandatory or not.
- Active: Set the .
- Files: Upload any files connected to the assignment, for example the assignment text or additional aids. Files can be uploaded from your computer or from the Dropbox cloud service.
- Assessment: Choose an assessment scale from the drop-down list. You can also use criteria-based assessment.
- Use groups: This option allows groups to submit the assignment answers.
- Do not use groups: This is the default option. Groups are not used, and the participants submit the assignment answers individually.
- Learner-defined groups: The participants are allowed to create their own groups and submit the assignment. Learners that don't belong to any group are allowed to submit the assignment individually.
- Course groups: If you select this option the groups you have created in a course can submit assignments.
- Self-enrolment: When taking part in a group assignment, a learner has the option of joining an existing assignment group. This allows a teacher with, for example, 60 participants in a course to hand out an assignment and tell the learners to organize themselves in groups of, for example, four.
- Click Save.
 Editing an assignment
- Enter a course.
- Click the assignment you want to edit.
- Click the settings cogwheel in the top right corner and select Editfrom the drop-down.
- Edit the assignment. The fields are described in "Adding an assignment" above.
- Click Save.
 Deleting an assignment
- Enter a course.
- Click the assignment you want to delete.
- Click the settings cogwheel in the top right corner and selectDelete from the drop-down list.
- Confirm by clicking OK in the pop-up box.
 Submitting an assignment answer
- Enter a course.
- Click the assignment you want to submit.
- Click Submit answer in the work area.
- Fill in the following fields:
- Title: Enter the answer title.
- Files: Click Upload file to upload an assignment answer from you computer or from Dropbox.
- Text: If you did not upload a file in the step above, you may enter the assignment answer here.
- Group: If the group hand-in function is enabled, either select the group to which you belong (from the drop-down list) or select the other participants (in the box on the right, by clicking on them in the list and using the
 button to transfer them to the box on the left).
-
Click Submit answer.
 Assessing individual assignments
- Enter a course.
- Click the assignment you want to assess.
- Make sure the Assessments are status is set to Not available in the top left corner of the work area. This is to prevent the participants from seeing your comments and assessments while you are assessing.
- Click Show behind a participant to start correcting an assignment.
- This opens a page that has the following fields:
- Submitted by: The name of the participant who has submitted the assignment.
- Participants: If there are other participants who participate in this assignment answer, they are listed here.
- Files: If the participant has uploaded files in the assignment, they can be downloaded here. If you want to comment directly on the file, you can use the DirectEdit Create comment function.
- Title: This is the title the participant has created for the assignment.
- Text: If the participant wrote in the text field, the text is shown here.
- Status: The status you set on the assignment, for example Submitted, Not approved or Approved. Choose a status from the drop-down list.
- Comment: Here you are allowed to write comments to the participant.
- Comment files: If you commented directly in the assignment using DirectEdit, the comment files are listed here.
- Click Save.
 Assessing multiple assignments
- Enter a course.
- Click the assignment you want to assess. Make sure the Assessments are status is set to Not available in the top left corner of the work area. This is to prevent the participants from seeing your comments and assessments while you are assessing.
- Click Assess multiple.This allows you to assess all the submitted assignments. You can select specified participants in the overview by selecting the check box in front of their names before clicking Assess multiple.
- The assess multiple overview has four fields:
- Assess answers for: This is a list of the names you currently assess.
- Status: The status you set on the assignment, for example, Submitted, Not approved or Approved. Choose a status from the drop-down list. If you do not want to change the status, select the default option Do not change.
- Assessment: From this drop-down list, you can select an assessment. The assessment scale in the drop-down list is identical to the one you selected when you added the assignment.
- Comment: In this field you can enter a comment that the participants see when they receive the assessment.
- Click Save.
 Making the assessment available for the participants
When you have finished assessing and correcting the assignments, you are ready to publish the results to the participants.
- Enter a course and click the assignment for which you want to make the assessments available.
- In the top left corner, click Change behind the Assessments are heading. The status should change from Not available to Available.
 Managing assignment permissions
- Enter a course.
- Click the assignment for which you want to adjust permissions.
- Click the settings cogwheel in the top right corner and selectPermissions from the drop-down (). Here you have three options:
 1. Select who can take this assignment
- Click Select who can take this assignment.
- Under 'Select from among', choose Participants or Groups.
- Check the name of the participants or groups to which you want to grant permissions.
- Click

- Click Save.
 2. Select who can correct the assignment answers
- Click Select who can correct the assignment answers.
- Under 'Select from among', choose Participants or Groups.
- Check the name of the participants or groups to which you want to grant permissions.
- Click

- Click Save.
 Related Topics


